How to Upload Email Lists
Uploading your email list correctly to the Orbee Platform ensures your email marketing campaigns run smoothly and effectively. This guide helps you avoid errors and get the most out of the list uploading features.
Step 1: Access the Lists Section
In the Platform, navigate to Email Marketing > Lists and click on the + New List button to start the import process.

Step 2: Prepare Your Email List
To guarantee a smooth and successful upload of your email list, it's essential to meticulously follow the provided template:
- Using the Template: The easiest way to avoid errors is to download Orbee's template and input your data directly into it. This ensures the correct format and headers.

- Column Names: Ensure your column headers in your CSV UTF-8 file exactly match those in the template provided by Orbee. Even minor variations can disrupt the upload.
- first_name
- last_name
- name
- phone
Note: Fill out all necessary columns, especially the email address column. Every row must have a valid email address. Missing or incomplete data can lead to an inaccurate and ineffective email list.
Step 3: Upload Your List
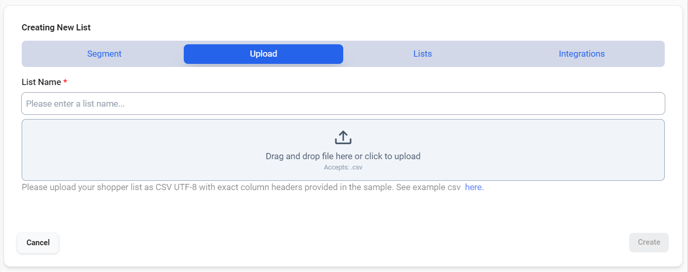
After navigating to + New List in the Email Marketing tab, click the "Upload" button and choose the correctly formatted CSV UTF-8 file from your computer. Name your list and click Create to finalize upload.

Step 4: Monitor Upload Status
The upload process may take a few minutes, depending on the size of your list. You will also be notified at the top right of your screen that you have successfully created the list and see that it is processing live. You can refresh your screen periodically to check the status. A "Complete" message in green indicates a successful upload.

Clicking on the list name (in blue) allows you to review its contents, serving as a handy troubleshooting tool. This lets you spot-check and verify that all intended profiles and data have been uploaded correctly.

